

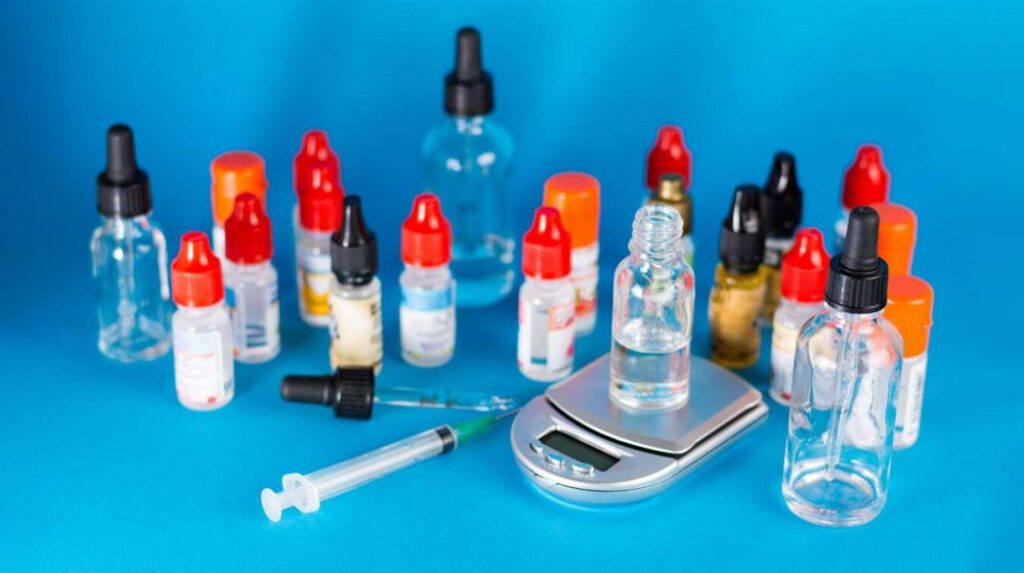
Making your own vape juice is one of the most rewarding things you can do as a vaper. You get full control over flavor, nicotine strength, and the PG/VG ratio, and you save serious money doing it. A 30 mL bottle of commercial e-liquid typically runs $15 to $25. Making the same amount at home costs about $2 to $4 in ingredients.
But DIY mixing is not something you should jump into blind. You are handling concentrated nicotine, which is toxic at high doses. Get the measurements wrong and you can end up with juice that is too harsh, too weak, or unsafe. This guide walks through the entire process, from ingredients and equipment to mixing, steeping, and storage, with safety covered at every step.
What you need to make vape juice
There are four core ingredients and a few essential tools. Do not start without all of them.
The four ingredients
1. Vegetable glycerin (VG) , A thick, sweet liquid that produces dense vapor. USP-grade (pharmaceutical purity) is the only kind you should use. VG is what gives clouds their volume and smoothness. It is slightly sweet on its own, which adds to the overall flavor profile. For more on what VG and PG are at a molecular level, see our guide to e-cigarette ingredients.
2. Propylene glycol (PG) , A thinner liquid that carries flavor better than VG and provides a stronger throat hit. Also USP-grade only. PG is what makes the flavor pop and gives you that familiar hit at the back of your throat. Some people are sensitive to PG and experience irritation; if that is you, lean heavier toward VG.
3. Flavor concentrates , Food-grade flavorings designed specifically for vaping. This is critical: do not use baking extracts, cooking oils, or anything not labeled for inhalation. LorAnn, Flavorah, Capella, TFA (The Flavorers Apprentice), and Inawera are among the most widely used and trusted brands in the DIY community. Concentrates are typically used at 5% to 20% of the total volume, depending on the flavor and brand.
4. Nicotine liquid , Optional, but if you want nicotine in your juice, you need a concentrated nicotine solution, typically 100 mg/mL in a PG or VG base. This is the most dangerous ingredient you will handle. At 100 mg/mL, even a small spill on bare skin can deliver a significant dose. Always wear nitrile gloves and eye protection when handling concentrated nicotine. Store it in a locked cabinet away from children and pets. If you want to skip nicotine entirely, see our article on whether nicotine-free vapes are safe.
The equipment
| Tool | Why you need it |
|---|---|
| Syringes or graduated cylinders (1 mL and 10 mL) | Precise measurement of each ingredient; guessing is not acceptable |
| Digital scale (0.01 g accuracy) | Weight-based mixing is more accurate than volume-based; the DIY community standard |
| Empty bottles (PET or glass, childproof caps) | For mixing and storing; 30 mL to 120 mL sizes |
| Nitrile gloves | Skin protection when handling nicotine and concentrated flavors |
| Safety goggles | Eye protection against nicotine splashes |
| Paper towels and a clean workspace | Spills happen. Be ready to clean them immediately |
| Labels and a marker | Every bottle gets a label with date, nicotine strength, PG/VG ratio, and flavor name |
A note on scales versus syringes: the DIY community overwhelmingly recommends mixing by weight (grams) rather than by volume (mL). Different ingredients have different densities (VG is about 1.26 g/mL, PG is about 1.04 g/mL), so volume measurements introduce error. A 0.01 g scale eliminates this problem and makes the process faster once you are used to it.
Ingredients to avoid
Some things should never go into vape juice. This is not negotiable.
- Water and alcohol. Old-school DIY guides sometimes suggested adding vodka or distilled water to thin e-liquid. This is outdated advice. Water can promote bacterial growth in stored juice, and alcohol can alter the vaporization temperature. If you need a thinner liquid, use more PG or look into aqueous glycerin (AG), which is VG pre-diluted with a small amount of distilled water.
- Cooking extracts and essential oils. Vanilla extract from the baking aisle contains alcohol and compounds not tested for inhalation. Essential oils (like tea tree, eucalyptus, or citrus oils) contain volatile organic compounds that can be harmful when heated and inhaled. Only use flavor concentrates made for vaping. For more on what belongs in e-liquid and what does not, see our breakdown of chemicals found in vapes.
- Sweeteners with sugar. Sugar caramelizes when heated and can gunk up your coil fast. If you want sweetness, use sucralose-based sweetener concentrates made for e-liquid (though even these will reduce coil life).
- Excessive nicotine. Never use nicotine stronger than 100 mg/mL concentrate. Higher concentrations are dangerously toxic and offer no advantage for home mixing. Always double-check your math with a calculator before adding nicotine.
Understanding PG/VG ratios
The ratio of PG to VG determines the character of your vape. Here is what different ratios feel like:
| PG/VG ratio | Best for | Characteristics |
|---|---|---|
| 50/50 | Pod systems, MTL tanks | Balanced throat hit and vapor; thin enough for small coils |
| 30/70 (PG/VG) | Sub-ohm tanks, RDA/RTA | Bigger clouds, smoother hit, flavor slightly muted vs 50/50 |
| 20/80 (PG/VG) | Cloud chasers, high-wattage | Maximum vapor production; very smooth; may not wick well in some pods |
| Max VG | Competitive vaping, specific RDA builds | Thickest juice; very dense clouds; requires large wicking holes |
If you are using a disposable vape or a low-wattage pod system, stick with 50/50. Thicker juice will not wick properly and will give you dry hits.
Step-by-step: how to make vape juice
Step 1: Use a calculator
Before you touch a single bottle, plug your recipe into an e-liquid calculator. This is not optional. You need to know exactly how many grams or milliliters of each ingredient to add, and the math changes with every recipe.
Recommended calculators:
- E-Liquid-Recipes.com , Free, community-driven, has a massive recipe database
- Steam Engine , Another free, widely used calculator
- DIY Mixology apps (iOS/Android) , Mobile-friendly options
Enter your desired batch size, target nicotine strength, PG/VG ratio, and flavor percentages. The calculator does the math. For beginners, keep flavor percentages between 5% and 15%. More flavoring does not mean better flavor. Over-flavored juice tastes harsh and chemical-like.
Step 2: Prepare your workspace
Cover your work surface with paper towels. Put on nitrile gloves and safety goggles. Make sure you are in a well-ventilated area. Keep children and pets out of the room. Have a bottle of hand sanitizer and extra paper towels within arm’s reach.
Step 3: Measure the base liquids
Place your empty bottle on the digital scale and tare it to zero. Add VG first (it is the thickest and takes the longest to pour), then PG, according to the calculator’s output. If you are mixing by volume with syringes, draw PG first (it is thinner and cleans out of the syringe more easily), then VG.
Step 4: Add nicotine (if using)
Using a clean syringe or by weight on the scale, add the calculated amount of nicotine. Go slowly. If you are unsure, add slightly less than the calculator recommends. You can always add more later; you cannot take it out once it is in.
Wipe any spills immediately with paper towels. Wash your hands after handling the nicotine bottle, even if you wore gloves.
Step 5: Add flavor concentrates
Add each flavor concentrate according to the recipe. If you are new to this, start with single-flavor recipes so you can learn what each concentrate tastes like before combining them. A simple strawberry or vanilla custard single flavor at 8% to 12% is a good first recipe.
Again, less is more. You can always add more flavor later. Over-flavored juice is the most common beginner mistake.
Step 6: Cap, shake, and label
Seal the bottle and shake vigorously for one to two minutes. Label the bottle immediately with: the date, the flavor name, the nicotine strength (in mg/mL), and the PG/VG ratio. You will not remember what is in that bottle a week from now. Label it.
Steeping: why patience matters
Freshly mixed juice rarely tastes good. The flavors need time to blend and mature. This process is called steeping, and it makes a massive difference in flavor quality.
How to steep
- Room-temperature steeping: Store the bottle in a cool, dark place (a drawer or cupboard works). Shake it once a day. This is the most common method.
- Breathing: Remove the cap for a few hours on the first day to let volatile compounds (like alcohol from some flavorings) evaporate. Then recap and steep normally.
- Warm-water bath: Place the sealed bottle in warm (not hot) water for 10 to 15 minutes, then shake. This speeds up steeping but can degrade delicate flavor notes if overdone.
- Magnetic stirrer: Some dedicated mixers use a magnetic stir plate to continuously agitate the juice for several hours. Effective but not necessary for beginners.
Steeping times by flavor type
| Flavor category | Recommended steep time | Notes |
|---|---|---|
| Fruit / menthol | 1 to 3 days | These flavors come together fast; some are shake-and-vape |
| Cream / custard | 1 to 2 weeks | Creamy notes need time to develop depth |
| Tobacco | 2 to 4 weeks | Tobacco flavors are the slowest to mature; patience pays off |
| Dessert / bakery | 1 to 3 weeks | Complex blends with multiple layers take the longest |
Test your juice every few days by vaping a small amount. When it tastes smooth and the flavors are balanced, it is ready. If you are also curious about how long your lungs take to recover from vaping, see our article on whether lungs heal after vaping.
How to store vape juice
Proper storage keeps your juice fresh and maintains flavor quality.
- Keep it cool and dark. Heat and UV light degrade both nicotine and flavorings. A cupboard or drawer away from windows is ideal. Do not store juice in your car, near a heater, or on a sunny windowsill.
- Minimize oxygen exposure. Once a bottle is partially used, the air gap at the top accelerates oxidation. Transfer to a smaller bottle if you have less than half left, or squeeze out the excess air before capping.
- Avoid humidity. Moisture can seep into poorly sealed bottles and promote bacterial growth. Keep juice in a dry location.
- Check for color changes. Nicotine oxidizes over time, turning from clear to yellow to brown. This is normal and does not mean the juice is unsafe, but the flavor may shift. If it smells off or tastes harsh, toss it.
- Shelf life. Most DIY juice lasts 1 to 2 years when stored properly. Nicotine-free juice can last even longer since there is nothing to oxidize.
Nicotine safety: the rules you cannot skip
This section deserves its own heading because it is that important. Nicotine is a toxic substance. At 100 mg/mL concentration, one milliliter on your bare skin can deliver the equivalent of smoking several cigarettes in minutes. Here are the non-negotiable rules:
- Always wear nitrile gloves and safety goggles when handling nicotine concentrate
- Work in a well-ventilated area, never in a closed room
- Keep nicotine in its original childproof container, stored in a locked cabinet
- If nicotine gets on your skin, wash it off immediately with soap and water
- If you feel dizzy, nauseous, or get a headache while mixing, stop and get fresh air immediately
- Never leave mixing supplies or nicotine unattended
- Clean all spills immediately, even tiny ones
- Dispose of used gloves, syringes, and paper towels in a sealed bag before throwing them in the trash
For more on nicotine’s effects on the body, see our guide to symptoms of vaping too much.
Why make your own vape juice?
Cost savings. This is the biggest draw for most people. A liter of VG costs about $15 to $20 and makes roughly 33 bottles of 30 mL e-liquid. That works out to under $1 per bottle in base costs, compared to $15 to $25 for commercial juice. Even factoring in flavor concentrates and nicotine, you are looking at $2 to $4 per 30 mL bottle.
Customization. You control every variable: flavor, nicotine strength, PG/VG ratio. If commercial juice at 3 mg/mL is too weak but 6 mg/mL is too strong, you can make 4.5 mg/mL. If you want a 65/35 PG/VG blend with blueberry and cheesecake, you can make it. No manufacturer offers that level of flexibility.
You know exactly what is in it. No mystery ingredients, no unlisted additives. You bought the VG, the PG, the flavor, and the nicotine. You know what went into the bottle because you put it there yourself.
FAQ
Is it cheaper to make your own vape juice?
Yes, significantly. A 30 mL bottle of DIY juice costs about $2 to $4 in ingredients, compared to $15 to $25 for commercial e-liquid. The upfront investment in supplies (scale, syringes, bottles) runs about $30 to $50 but pays for itself after the first few batches.
Are DIY vape juice kits worth it?
Some are, some are not. The problem with most kits is that they include low-quality flavor concentrates. It is usually better to buy individual ingredients from reputable brands like Capella, Flavorah, or TFA and build your own collection.
Can I use food flavoring to make vape juice?
No. Food flavorings often contain oils, diacetyl, or solvents that are safe for eating but harmful when heated and inhaled. Only use flavor concentrates that are specifically made for vaping.
How long does DIY vape juice last?
Properly stored in a cool, dark place with minimal air exposure, most DIY juice lasts 1 to 2 years. Nicotine-free juice can last longer. If the juice changes color dramatically, smells off, or tastes harsh, throw it out.
What PG/VG ratio should beginners use?
50/50 is the safest starting point. It works in almost every device, provides a good balance of flavor and vapor, and wicks reliably. Once you understand how different ratios feel, you can experiment from there.
Do I need a scale to make vape juice?
It is strongly recommended. Mixing by weight (grams) is far more accurate than mixing by volume (mL) because VG and PG have different densities. A 0.01 g digital scale costs about $15 and will last for years.
—
Sources: E-Liquid-Recipes.com calculator and recipe database; FDA 21 CFR 182.1320 (glycerin GRAS status); American Association of Poison Control Centers, nicotine exposure guidelines; DIY mixing community best practices (r/DIY_ejuice); Flavor concentrate manufacturer recommendations (Capella, Flavorah, TFA, Inawera); Vape Grove (2025), “DIY Vape Mixing Safety Tips”; Fantastic Juice (2026), “Essential DIY Vape Juice Safety Checklist.”


Build your vape knowledge
Read more guides
Find explainers, how-to articles and reference material.
Open guide library →Compare vape products
Check specifications across the product database.
Open product data →Read hands-on reviews
See tested devices and documented trade-offs.
Read review coverage →